by Jon A. Bell and Scot Tumlin
|
Visual Concepts
Engineering
Artbeats
Software Inc. |
From the beginning of cinema, effects artists have used an enormous bag of tricks to create the illusion of reality. Everything from stop-action, double-exposure, split-screen, foreground miniatures, glass and matte paintings, and traveling mattes to sophisticated digital imaging techniques have been used to create effects that are both subtle and spectacular.
Many 3D designers and animators are initially drawn to the field of computer graphics imagery (CGI) through an interest in TV and cinematic special effects. When you get right down to it, any CG shot is basically a special effect: You're simulating events, both real and unreal, using 3D modeling, lighting, rendering, and compositing. It's this freedom to create, well, anything, that makes CG especially well-suited to fantasy and science-fiction-oriented effects. With CGI, you can bring dinosaurs to roaring life or fly spaceships through the cosmos-and then blow them up spectacularly in the comfort of your own desktop computer.
In this article, we'll concentrate on pyrotechnics, or plain and simple, blowing up stuff. We'll take a look at the basics for creating 3D explosion effects in virtually any 3D program. You'll then see how you can use pre-rendered, third-party explosion imagery to produce epic conflagrations of smoke and flame. Although the techniques described here can be applied to many popular 3D programs, you'll see examples of the final effects done in 3D Studio MAX (3DS MAX) 2.5 and Alias 8.0.
Explosions 101: Breaking Down Your Scene Creating a complex special effects sequence for 3D involves careful planning and some basic proof-of-concept testing. Before you blow something up (even if it's only harmless pixels), ask yourself some important questions:
What's the subject? Is it a condemned building being blown up with dynamite, an attacking spaceship getting whacked with a photon torpedo, or a distant nuclear blast set in the desert? In a 3D scene, each of these subjects will have its own special requirements. Each subject is going to react differently according to the laws of physics (and assumed physics for science-fiction subjects). If your subject is a building, then take a look at reference footage of buildings being demolished. (If you scan around cable TV long enough, you're bound to catch some special called something like Urban Terror IV: When Buildings Explode!!!, typically aired during ratings sweeps weeks on Fox or the WB network.) The look of this type of effect is very distinctive. Typically, demolition crews place charges in weakened areas of a building's foundation. The charges are then detonated sequentially so that the building collapses in a pile of dust.
In cinematic pyrotechnics involving miniatures, the effects artists often pre-score the models-they cut or scribe stress or fracture lines in the back sides of the models. Then they fill the miniatures with convincing debris, such as tiny furnishings appropriate for a building, pack it with the required explosive charges, and then boom! In addition, the camera operator almost invariably will film the effect using a high-frame rate to slow down the explosion and make it appear larger.
Producing this effect in 3D is a similar, two-fold process. You create the initial blast (which may consist of a bright flash, the windows blowing out, clouds of dust) followed by the physical effect, which is the actual collapse. You may want to have two different versions of your building: a before and an after (or a during). The before model is what you render to the point of the explosion, then you may have the explosion effect conceal a transition to a "breakaway" 3D version of the building. The latter might consist of your original 3D geometry that you've broken up into separate component pieces, perhaps with rough edges and "dirtied" versions of the original texture maps. You might also include jagged bits of generic debris to throw into the mix.
The Right Tools for the Right Job Each explosive device, whether dynamite, a fantasy energy weapon, or a real-world atomic blast, has its own particular visual characteristics that should be taken into account. Was the explosion fueled by gasoline or gunpowder? Compressed air or a sun going nova? Will it produce flame, black smoke, or a rolling dust cloud? Does it erupt from a single point, or as a series of smaller detonations leading up to a big bang?
All of these questions, in turn, affect how you set up your 3D animation, both in terms of staging (camera angles, lighting, scene choreography, and timing) and the 3D tools used.
One of the most important considerations in creating your explosion is verisimilitude-that is, the appearance of being real. Interactive lighting is important here-if your scene has a bright gasoline bomb or a simulated nuke going off, you should also have intense, animated lighting cues to tie the explosion optical into the rest of the scene.
Once you've answered the previous questions, there's one more you need to ask: What 3D tools do you have available to create the appropriate pyrotechnic effect?
You don't necessarily need the latest custom plug-ins to create convincing pyrotechnics in your native 3D package (although they can definitely help). You may be able to use your 3D application's native particle systems, volumetric lights, post-processing optical effects (lens flares, highlights, and glows), pre-rendered image sequences, or a combination of all of these to produce the required effect.
Let's say you're rendering a typical 3D subject: an outer-space dogfight sequence. You've been inspired to create this after watching Star Wars for the 20th time or seeing the current episode of Babylon 5 or the latest incarnation of Star Trek. A spaceship flies through the scene, gets hit by an off-screen missile on frame 100, and is blasted into atoms. You've got your spaceship model(s), your starfield backdrop, your scene lighting, and camera moves down pat-now you have to choreograph beautiful destruction. You look over your software's native tools and your current plug-ins-some commercial, some shareware-you figure out your options, then decide to use all or most of them.
Bait-and-switch On frame 100, when the ship gets hit, you swap your "beauty" model for a trashed version, or big chunks of wreckage that follow some of the basic contours of your ship. You then hand-animate these flying willy-nilly through your scene. If your program lets you set visibility keys, such as in 3DS MAX, then you parent the wreckage to the beauty model, unhide the wreckage on frame 100 while simultaneously hiding the unblemished model. You then cover up the transition with other elements in your scene.
|
|
|
|
Particle systems You decide that, at the moment the ship is hit, you want a burst of particles to erupt from the impact point. Typically, you would parent (or link) a particle system to your spaceship model and trigger a burst of particles right when the explosion is supposed to occur. The particles should be fairly numerous, erupt quickly, and dissipate in a chaotic manner. Since you're in space, there's no gravity; the particles should blast outwards in a rough sphere shape or perhaps be blown directly at the camera. (You might want to have a stream of particles spewing out in a particular direction to imply burning fuel being ejected from a fractured engine core.)
What kinds of particles should you use? It depends on your 3D program. Many standard 3D particle systems will render the particles at a user-definable size. By making them small (even single-pixel-size), you can create the illusion of glowing sparks being thrown off.
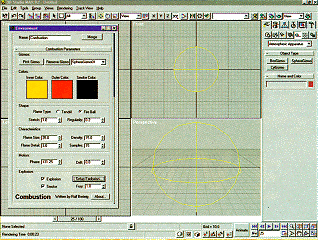
Volumetric Effects If you have volumetric or atmospheric effects options, then you might be able to create a plasma cloud or fireball, either singly or in conjunction with your particle systems. 3DS MAX's native Combustion atmospheric apparatus can create beautiful fire, smoke, and fiery explosion effects, as can Peter Watje's shareware-Particle Combustion, Object Combustion, and Vertex Combustion plug-ins. Commercial 3DS MAX plug-ins, such as Animation Science's Outburst, Lumens' Afterburn, and Digimation's Ultrashock can produce photo-real effects, as can Dynamic Realities' Particle Storm for LightWave 3D. (An example of a 3DS MAX Combustion explosion is shown in Figure 1a and 1b.)
An animated light with volumetric effects may also fit your needs. Alias PowerAnimator and 3DS MAX's Lens Effects features enable you to create complex explosion effects simply by applying animated volumetric effects to lights in your scene. By keyframing the lights' density, brightness, colors, and fractal noise settings, you can produce explosions ranging from electrical to gaseous.
Animated Materials You have the particle systems set up but also want to animate your material settings for both the particle systems and perhaps the textures on the ship fragments. You decide that at the moment of explosion, you want the particles to be white-hot, so you need to keyframe their material settings to pure white. As the particles dissipate through the scene, animate their colors from, for example, white to yellow to orange to red, then finally to black.
For the spaceship textures, you may want to add a self-illuminated material and/or mask to your Diffuse map (implying that the metal hull itself is burning away).
Post-processing Optical Effects To create additional visual "oomph" in your scene, you decide to incorporate some optical effects. For the initial blast, you can augment your particles with animated glows and sparkling highlights. Again, 3DS MAX's Lens Effects Video Post plug-in enables you to add these effects to elements in your scene, whether they be lights, particles, or mesh geometry.
Finally, if your software has built-in physical dynamics or is available as a plug-in, you could take advantage of this feature for added realism. If the object in your scene is blown into big chunks, hand-animate the pieces flying by the camera and/or bouncing off the ground. However, if you can run an effective collision/physics simulation in a program, such as 3DS MAX, LightWave, Alias/Maya, or Softimage, it can save you a lot of hand keyframing (although you may experience some increased rendering time due to the complex calculations of the simulation).
Using Pre-Rendered Sequences Using procedural effects such as volumetric lights and complex particle systems in an elaborate 3D scene may increase your rendering times to an unacceptable level. However, there's another alternative, which is to use pre-rendered imagery. Since many 3D artists enjoy creating pyrotechnic effects, a couple of companies have actually capitalized on this to provide cinematic spectacle to your 3D scenes.
|
|
 Figure 3. A flat piece of 2D geometry parented to the spaceship subject serves as the source for the explosion effect. |
 Figure 4. An explosion image sequence loaded into 3DS MAX's Material Editor. |
These two companies are Visual Concepts Engineering (VCE) in Sylmar, CA, and Artbeats Software, in Myrtle Creek, OR. VCE, formed by special effects expert Peter Kuran (Star Wars, Conan The Barbarian, Dragonslayer), started the trend by digitizing 35mm film of real explosion elements used in his Hollywood effects work. VCE offers these sequences, along with digitized shots of fire, smoke, and electrical effects on its Pyromania series of CD-ROMs, now in three volumes, for Macintosh and PC. The animations consist of separate image sequences rendered as sequentially-numbered, 24-bit .tif or .tga files, mostly at 640 x 480 resolution.
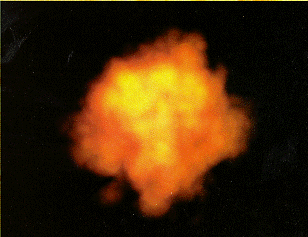
Artbeats Software offers two sets of pyrotechnic wonders: the ReelFire and ReelExplosion series of CD-ROMs. Both ReelFire and ReelExplosions are available in two volumes. The sequences consist mostly of 720 x 486 resolution Quicktime .mov files, readable by both Macintosh and PC. Some sequences include alpha mattes and high-resolution versions over 1,024 pixels wide. Like the Pyromania CD-ROMs, the Artbeats offerings include numerous explosion sequences, including ground bursts, air bursts (affected by gravity), and zero-g bursts (unaffected by gravity). A sample frame from one of the Artbeats explosions is shown in Figure 2.
The zero-g sequences are probably of most interest to those wanting to create Star Wars-style explosive effects. If you want to incorporate these effects in a space battle, here's what you do:
In your 3D program, create a flat (2D) piece of planar geometry, either polygonal, patch, or NURBS-based, and make it the same proportions as the bitmap image sequence you're going to use. Apply planar mapping coordinates to it, then place this geometry in your scene where you want the explosion to occur. It should face perpendicular to your camera view, as shown in Figure 3.
The size of the plane determines how large your explosion will be, of course. You can place the planar geometry in front of, behind, or smack in the middle of your subject. To make it look as if the explosion is instantly engulfing your spaceship, first place the planar geometry slightly behind the spaceship (relative to the camera view). At the time of detonation, keyframe the planar geometry so that it makes a quick move-occurring on only five or six frames-towards the camera, sliding "through" the spaceship. This will help offset the 2D nature of the explosion effect. It also helps you make the swap from the intact spaceship model to a damaged one or a cloud of expanding debris.
Next, go into your Material or Surfaces editor, load your explosion bitmap sequence into a material slot (usually the Diffuse), and load this same sequence as an Opacity or alpha mask. Although some of the explosion sequences on the Artbeats ReelExplosion CD-ROMs include separate alpha channel masks, you can usually use the same Diffuse sequence to force a transparency effect-so you see only the explosion. (If you see an opaque black rectangle where your planar geometry is, it'll spoil the effect, of course. You might also create your own alpha masks by processing the original Diffuse bitmaps in a program such as Photoshop or DeBabelizer.) You should set this Explosion Material to be constant, or self-illuminating, with additive transparency, if your program allows it. Then, apply it to the planar geometry. An example of an explosion bitmap sequence in 3DS MAX's Material Editor is shown in Figure 4.
To make the explosion occur on a particular frame, add an offset
to your image sequence using your program's native tools. A crude (and
memory-inefficient) way to do this is to simply re-number your original
sequence.
You make the first frame number
of the actual explosion bitmap
sequence the same number as when you want the explosion to occur in your
animation. Then add X numbers of black frames, numbered sequentially, before and
after the actual explosion bitmap series.
A better way to do this is to use your 3D program's image offset tools, such as 3DS MAX's Start Frame feature in the Materials Editor (under the Diffuse Map/Time rollout), or an image file list (.ifl) for the bitmaps. With the latter, you can have the Materials Editor load the same black frame for X number of animation frames, then on frame 100, it begins loading the actual explosion bitmaps. (Note that the Start Frame feature in 3DS MAX will "freeze" the bitmap sequence in your scene until the specified frame. To keep a still image of the first explosion frame from floating in your scene, set Visibility keys at the appropriate times for the planar geometry. You could also keyframe the Diffuse and Opacity components of the material so that they're at zero until frame 100, then they instantly pop up to 100 percent at the appropriate time.)
If you've set up this effect correctly, then the explosion should
appear to blow apart the subject with fire
and fury.
Explosions on Many Levels One problem you might encounter with this flat planar technique is that some of your favorite explosion bitmap sequences have imagery that goes to the edges of their frames. Both VCE and Artbeats offer explosion sequences that stay "in frame" throughout the sequence. However, some of their best sequences have fire, smoke, or sparks that fly beyond the edges of the frame. If you use these sequences on your planar geometry, the explosion will appear to be cut off as it hits the edges of an invisible rectangle.
One way to fix this is to scale up the plane so that your 3D camera simply doesn't see the boundaries of the object. However, this may make the initial explosion effect too large or make the bitmap sequence too grainy-looking or fuzzy to be appropriate in the scene.
 Figure 5. An open-ended planar texture coordinates applied to the open end. |
 Figure 6. A still frame from the explosion sequence. |
Here's a better suggestion that enables you to use almost any pre-rendered explosion sequence, including full-frame versions: Instead of using a piece of planar geometry, create a large, open-ended cone of medium complexity, and center its apex in the middle of your subject. The edges of the cone should extend beyond the visual field of the camera. Apply planar-not cylindrical-mapping coordinates to the open end of the cone so that the bitmap sequence is stretched down the length of the cone. The planar map should be the size of the cone's open end, and the center of the texture should be at the apex of the cone, as shown in Figure 5.
If you render this sequence with the texture settings given earlier, the explosion will appear to stretch along the Z-axis towards the camera, heightening the 3D effect dramatically. Sparks or fire elements that go beyond the edges of the frame in the original texture sequence will appear to fly behind the camera and not off the edges of a rectangular shape. Figure 6 shows a still frame example.
To make this effect even more spectacular, create multiple cones of the same length, but of varying end sizes, all with their apexes in the same spot. (Ideally, the camera should still be able to move inside the mouth of the smallest cone, or else you should animate the cones so they always face the camera.) The thinner the cone, the more the explosion bitmap will appear to stretch towards the camera. If there are sparks in the original bitmap imagery, they will appear to elongate into fast-moving streaks of light that whip by the camera, producing a spectacular 3D effect. By using multiple cones of varying widths, you can produce complex multi-planar effects with sparks appearing to move at different rates of expansion-even if you're using the same bitmap sequence on all the cones! (Be sure you rotate the texture coordinates or the cones to help conceal the maps' similarity, though.)
All blown up With a little bit of experimentation, all of
these techniques can help you achieve the pyrotechnic effects you want. Whether
you're collapsing a building for an industrial video or creating a frenetic
homage to Star Wars, the wide variety of 3D tools at your disposal gives
you Vishnu-like power. With them, you can be both the creator-and
destroyer-
of worlds.
Jon A. Bell is a writer and 3D computer graphics artist who
designs for television, films, computer games, multimedia,
and print. E-mail
Jon at 74124.276@compuserve.com.
Scot Tumlin is a 3D artist and animator and frequent contributor to 3D
Design with more than seven years' experience creating digital content. E-mail
Scot at scottumlin@aol.com.